Friday, March 28, 2014

Funday Friday Challenge #43 - Tag You'r It!

Welcome to another Funday Friday Challenge. This week's Challenge is:
“Tag You’re It!”
Create a project using a mini tag!
 Our sponsors this week is:

Fitztown and Bugaboo

Make sure to play along this week~you don’t want to miss a chance for a great prize!
 Starts: Friday, March 28th 12:00 AM (central time)
Ends: Friday, April 4th 6:00 PM (central time)
Here is what I created for this week's challenge - and I even followed the challenge rules this week!


Fitztown has this beautiful butterfly digi stamp, called Garden 44, that I think can be so versatile! The original stamp is much larger and I think would make a beautiful background to a card or even a scrapbook layout. As you can tell, I like to pick stamps that I can picture using in multiple ways, not just for one project...usually. I made different sizes of the butterfly, used my water pen and SU markers to create pastel colored butterflies and fussy cut them all. I embossed tag base, made a banner and popped up my butterflies for dimension. I am thinking of using this as the tag for a friend's birthday gift so I'll stamp a birthday message on the back if I do. The embossing folder has an empty area in the middle of it that will be perfect for stamping even though it's covered by the banner. 

Make sure to stop by my DT sister's blogs to check out what they made for this challenge.

  Well my friends, it is YOUR turn to show us what you can do for this challenge!
Just link up using our link up tool at the bottom of this post for your chance to win top 3 and get entered into our monthly prize drawing.

What do you need to do to enter? The rules are simple…
Challenge Rules
1. Please post a direct link to your card/project post that includes your challenge, using the linky tool below.
2. Be sure to include a link back to our challenge
3. Three (3) entries per person and you must post a separate blog post for each entry.
4. All entries must be NEW and created for the current challenge.
5. You may combine with other challenges as long as you link back to us in your post.
 * All entries that do not meet the challenge requirements will not be eligible for top 3 or random/monthly wins.
The monthly prize drawings will only be mailed within the US and Canada only
You have until April 4th at 6:00 PM (central) time to link up. All winners will be announced on Monday, April 7th.
Have fun and we look forward to seeing what you create!


Tuesday, March 25, 2014

Tasty Tuesday - Addicting Granola

Welcome back to another Tasty Tuesday. Today I am sharing with you my favorite granola recipe. After I made it for the first time it became my "go to" snack. I always have a batch in the fridge. I keep it in an airtight container in the fridge and it seems to last quite a while.


The recipe calls for making the granola into cluster balls but I just put it in a pan and break it up once it's completely cooled. I got the recipe from One Good Thing By Jillee. I find a lot of use things on this site so it is really worth checking out. A friend of mine adds milk and heats it up for breakfast. I just pop a few pieces anytime I want a "little something" to snack on.

Here's the recipe:

Ingredients
  • 1 lb quick oats
  • 3 cups coarsely chopped raw nuts and/or seeds 
  • 1 teaspoon ground cinnamon
  • 2 cups dried fruit 
  • 1 cup, packed brown sugar
  • 1 cup (2 sticks) butter
  • 1/2 cup maple syrup
  • 1/2 cup honey
  • 1/3 cup water
  • 1/2 teaspoon salt
  • 2 teaspoons vanilla extract
  • Optional: chocolate chips
Directions
Preheat the oven to 350 degrees. In a food processor, coffee grinder or blender, grind half the oats to a fine powder (this apparently is KEY when making clusters! Helps make the granola hold together better).
In a large bowl, combine the whole oats, ground oats, nuts, spices, and dried fruit.

In a saucepan over medium heat, combine the brown sugar, butter, maple syrup, honey and water and heat until the mixture starts to bubble. Stir in the salt and vanilla. Pour this over the oats and nuts, stirring well to coat. Let stand for about ten minutes. 

Spread the mixture out on a large baking sheet and bake for 25-30 minutes, or until the top is golden brown. Remove from the oven and allow to cool completed. Gently breaking up the mixture into small-to-medium sized clumps.

Enjoy!
Joyce

Saturday, March 22, 2014

Funday Friday Challenge #42 - Sketch

Welcome to another Funday Friday Challenge. This week's Challenge is:
“Sketch”
Create a card, layout or project from this sketch!


Our sponsors this week is:

Kenny K

Make sure to play along this week~you don’t want to miss a chance for a great prize!
 Starts: Friday, March 21st 12:00 AM (central time)
Ends: Friday, March 28th 6:00 PM (central time)

Now you don't want to do what I did for this challenge! I totally forgot to use the sketch...my senior moments have started!  I did use an adorable set from Kenny K - Easter Accessories. And ironically, I even made two cards, one for each of my younger nieces for Easter...lol! But I will be making a card to go with the sketch later this week and updating this post so please check back Tuesday or Wednesday. But I have to get ready to catch a flight to Florida to visit my sister and BIL and I don't think the captain will understand my wanting to delay the flight to make a card. 


I printed out the digi stamp set and colored everything using my SU markers and water color pen for the baskets. I used the fringe scissors to create the two layers for the grass. I cut a slit in the basket to tuck in a few Easter eggs. Oh, and I did spray the images with Perfect Pearls before fussy cutting to give it a little sparkle which is hard to see in the scan. And I popped up a few eggs to add a little dimension. I hope you like my "non challenge" card! 

Make sure to stop by my DT sister's blogs to check out what they made for this challenge - they actually followed the challenge rules! 
  Well my friends, it is YOUR turn to show us what you can do for this challenge!
Just link up using our link up tool at the bottom of this post for your chance to win top 3 and get entered into our monthly prize drawing.

What do you need to do to enter? The rules are simple…
Challenge Rules
1. Please post a direct link to your card/project post that includes your challenge, using the linky tool below.
2. Be sure to include a link back to our challenge
3. Three (3) entries per person and you must post a separate blog post for each entry.
4. All entries must be NEW and created for the current challenge.
5. You may combine with other challenges as long as you link back to us in your post.
 * All entries that do not meet the challenge requirements will not be eligible for top 3 or random/monthly wins.
The monthly prize drawings will only be mailed within the US and Canada only
You have until March 28th at 6:00 PM (central) time to link up. All winners will be announced on Monday, March 31st.

Have fun and we look forward to seeing what you create!

Tuesday, March 18, 2014

Tasty Tuesday - My Birthday Cake

For today's Tasty Tuesday I am sharing my absolute favorite cake of all time - homemade poppy seed cake. 

It's not a lemon poppy seed. And this cake is super moist and tasty. This is the cake my mom has made me for years for my birthday. I've had roommates who used to toast it and add a little butter to have it for breakfast....and I quickly discovered that is a tasty way to have it for breakfast. I just tell myself it's like having a poppy seed muffin for breakfast...lol! 

This actually takes a little time to make. The recipe is on the inside label of the Solo brand poppy seed filling can. But I can promise you, this cake is worth the effort!!! 

Here's the recipe copied right from the Solo website: 

Ingredients
1 cup butter or margarine, softened
1 cup dairy sour cream
1 1⁄2 cup sugar
2 1⁄2 cup all-purpose flour
1 teaspoon baking soda
4  eggs, separated
1 teaspoon salt
1 teaspoon vanilla
Confectioners sugar

Instructions
To bake this poppy seed cake, preheat oven to 350° F. Grease and flour 12-cup Bundt pan or 10-inch tube pan and set aside.Beat butter and sugar in large bowl with electric mixer until light and fluffy. Add poppy filling and beat until blended. Beat in egg yolks, 1 at a time, beating well after each addition. Add vanilla and sour cream and beat just until blended. Stir flour, baking soda and salt until mixed, and add to poppy mixture gradually, beating well after each addition. 

Beat egg whites in separate bowl with electric mixer until stiff peaks form. Fold beaten egg whites into batter. Spread batter evenly in prepared pan. Bake 55 to 65 minutes or until cake tester comes out clean. Cool in pan on wire rack 10 minutes. Remove from pan and cool completely on rack. Dust with confectioners sugar just before serving.

Note: I generally beat the egg whites first in a separate bowl and put them aside. Then I don't need worry about cleaning off the mixer blades since they need to be clean to form the peaks. 

Enjoy!
Joyce

Friday, March 14, 2014

Funday Friday Challenge #41 - Clovers of Luck!

Welcome to another Funday Friday Challenge. This week's Challenge is:
“Clovers of Luck”
Create a card, layout or project using Clovers!
 Our sponsors this week is:

 Lawn Fawn has some adorable stamps - you really need to check them out!

Make sure to play along this week~you don’t want to miss a chance for a great prize!
 Starts: Friday, March 14th 12:00 AM (central time)
Ends: Friday, March 21st 6:00 PM (central time)

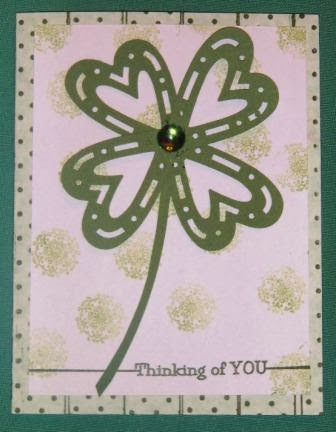
Here is what I created for this week's challenge:

I made my background using the 3 Twenty Crafts Background Builder stamp set. then on the white card stock I used the 3 Twenty Crafts Simple Sentiments Thinking of You. Then I used a hexagon from the 3 Twenty Crafts Say it From The Heart set to create my background.  I used the "stamp off" technique to get a lighter color for the background. After inking the stamp I stamped it on a piece of scrap first then on my card. I used a heart punch to create my Clover of Luck and hand cut the stem. And as always, a little piece of bling in the center to finish off the project. I hope you like!

Make sure to stop by my DT sister's blogs to check out what they made for this challenge.
  Well my friends, it is YOUR turn to show us what you can do for this challenge!
Just link up using our link up tool at the bottom of this post for your chance to win top 3 and get entered into our monthly prize drawing.

What do you need to do to enter? The rules are simple…
Challenge Rules
1. Please post a direct link to your card/project post that includes your challenge, using the linky tool below.
2. Be sure to include a link back to our challenge
3. Three (3) entries per person and you must post a separate blog post for each entry.
4. All entries must be NEW and created for the current challenge.
5. You may combine with other challenges as long as you link back to us in your post.
 * All entries that do not meet the challenge requirements will not be eligible for top 3 or random/monthly wins.
The monthly prize drawings will only be mailed within the US and Canada only
You have until March 21st at 6:00 PM (central) time to link up. All winners will be announced on Monday, March 24th.

Have fun and we look forward to seeing what you create!

Wednesday, March 12, 2014

Kits...

Is anyone else like me - I get a kit and then it just sits...and sits...and sits...  I have kits from crops and ones that I have purchased. And they have all been sitting on my shelf since they came to live in my craft room. But, I'm going to scrap my stash - and have tackled a few kits! I admit, I have added a few embellishments to most kits and have also donated and used some for the Woman's Club I belong to since I do their scrapbook.

Here's a kit I received from a crop in 2009, or maybe 2010. But either way, it was time to use it up. So I did a layout for the Franklin Woman's Club. A bunch of us went to Teaberry's Tea Room in Flemington, NJ for the afternoon. If you are ever in the area, you don't want to miss it!
  

I did add the piece of lace and the Time for Tea chipboard. I colored the chipboard with my Stampin' Up! markers. I purchased the Time for Tea chipboard at my favorite scrapbook store - Joys of Life Scrapbooking in Mechanicsburg, PA. The website isn't fancy but the store has an incredible selection and the classes are great...a little bit of everything! I just wish I didn't live 3 hours away. 

Now I feel like making a nice cup of tea!

Happy Crafting!
Joyce

Tuesday, March 11, 2014

Tasty Tuesday - Tangy Chicken Quesadilla

It's dawned on me that my blog is Joyce' Creative Crafts...and More. But I haven't been doing much of the "and more". So I am starting Tasty Tuesdays. I love to cook (and eat...lol!) so I'll be sharing some favorite recipes. It'll be a variety of long time favorites, new favorites and some from my Tastefully Simple Recipe Blog. But for the most part all the recipes will be easy and quick to prepare.

Here is a oh so tasty and oh so easy Tangy Chicken Quesadilla recipe that I enjoy. There is something about a quesadilla...maybe it's all the gooey cheese but they are one of my favorite appetizer-meals.


Here's the recipe:

Ingredients
1 pkt. Chipotle Beer Marinade Mix , divided
1/2 cup beer (I use ginger ale)
  • 2 boneless, skinless chicken breasts, sliced into 1-inch strips
  • 1 Tbsp. olive oil
  • ½ cup mayonnaise
  • 1 Tbsp. lime juice
  • 8 (8-inch) tortillas
  • 2 cups shredded cheese of choice
  • Non-stick cooking spray
  • Favorite taco toppings
  • Fresh cilantro for garnish (optional)


Directions
Set aside 1 tablespoon Chipotle Beer Marinade Mix. Combine remaining marinade mix, beer and chicken in resealable plastic bag. Massage bag so the chicken is coated; refrigerate for 30 minutes. Warm oil in skillet over medium low heat. Add chicken; discard leftover marinade. Sauté about 4-5 minutes on each side or until no longer pink; cool. In a separate bowl, combine remaining tablespoon of Chipotle Beer Marinade Mix with mayo and lime juice. When chicken has cooled, cut into small pieces. Place tortilla in pan sprayed with non-stick cooking spray. Cover half of tortilla with ¼-½ cup chicken; top with ¼ cup shredded cheese. Spread mayonnaise mixture over the other half of the tortilla and fold; cook about one minute. Turn over; cook for another 1-2 minutes, or until both sides are golden brown and the cheese is melted. Slice each quesadilla into 3-4 easy-to-grab pieces. Serve with your favorite taco toppings or chips and salsa.

Tips and Hints

  • If you have some fresh cilantro, chop some up and add it to the sauce.
  • Bud Light Lime® will add just a bit more citrusy flavor to the chicken, but any beer or light carbonated beverage will do the trick.
  • I found the best way to flip these while they're cooking is to try to them them like a page in a book, so the folded back edge of the tortilla always stays on the pan. This helps avoid any chicken or cheese from falling out (oh so important in making quesadillas!).
https://www.tastefullysimple.com/blog/blog-posts/tangy-chicken-quesadillas

Enjoy!
Joyce

Friday, March 7, 2014

Funday Friday Challenge #40 - Anything Goes!

Welcome to another Funday Friday Challenge. This week's Challenge is:
“Anything Goes”
Create a card, layout or project of your choice!
 Our sponsors this week are:

Bugaboo and Paper Nest Dolls

Make sure to play along this week~you don’t want to miss a chance for a great prize!
 Starts: Friday, March 7th 12:00 AM (central time)
Ends: Friday, March 14th 6:00 PM (central time)
I used the Bugaboo stamp Critter Sign It - Dog and here is what I created for this week's challenge:


I have to apologize for the photography. I left my camera at the office and this was the best I could get my phone to do today. I think the phone knows I'm thinking of trading it in...lol! What I really liked about this stamp - aside from it's a dog stamp - is the versatility. I look at it and see a chalk board or a computer which gives me so many ideas and directions to take my card. But tonight I just wanted a simple "hello I've been thinking of you card" to send out. So I used my chalks to color in my image and used the 3 Twenty Stamp set Strike a Pose. The stamp set has some cute sayings to choose from.

And since it was a dog stamp I couldn't resist adding the paw prints along the outside and the inside of card. 
Make sure to stop by my Design Team sister's blogs to check out what they made for this challenge, I promise you'll be glad you did!
  Well my friends, it is YOUR turn to show us what you can do for this challenge!
Just link up using our link up tool at the bottom of this post for your chance to win top 3 and get entered into our monthly prize drawing.

What do you need to do to enter? The rules are simple…
Challenge Rules
1. Please post a direct link to your card/project post that includes your challenge, using the linky tool below.
2. Be sure to include a link back to our challenge
3. Three (3) entries per person and you must post a separate blog post for each entry.
4. All entries must be NEW and created for the current challenge.
5. You may combine with other challenges as long as you link back to us in your post.
 * All entries that do not meet the challenge requirements will not be eligible for top 3 or random/monthly wins.
The monthly prize drawings will only be mailed within the US and Canada only
You have until March 14th at 6:00 PM (central) time to link up. All winners will be announced on Monday, March 17th.
Have fun and we look forward to seeing what you create!

Be Blessed and Happy Crafting!
Joyce


Wednesday, March 5, 2014

Is Your Stash Scrappin'?

So I want to check in with everyone - are you using your stash? I have been really trying to use my stash and it feels really good! I've found the key for me to using my stash is keeping myself organized. Okay...everyone who has seen my craft room can stop laughing now! It seems my table and desk are always a mess and I have to "create" room to work. But I have been trying to get my paper organized. I have created some of my own "kits" out of paper that matches really nicely and embellishments I want to use with the paper.

 
The stickers and patterned paper are the same line from Sandylion so I wanted to keep them together. I added ribbon, buttons, a leftover journaling box, two pieces of leftover bling (a circle and a corner but they kind of got lost in the photo) and matching cardstock.  And I have everything together in a folder so it's ready to go when I am.

Another thing - I've organized is my scraps. I have to admit...I totally scraplifted this idea from a friend who is a 31 Consultant. I have my scraps organized in an Organizing Utility Tote.


I basically used the ROYGBIV [red, orange, yellow, green, blue, indigo (I did add pink), violet (I did purple)] system we all learned in school for my file folders plus I added a few for categories such as patterned paper, floral paper and animal prints. To give the file folders stability my friend put her folders in an Iris Open Top Holder, which fits nicely in the tote and works with the letter size manilla folders.


You can see in the first photo my file folders are worn a bit which means I've been using my scraps!!! Decide the smallest size scrap you want to keep and throw anything too small for you to use out! You want to keep organized but not clutter things up with pieces you won't use.

I have also been using the Organizing Utility Tote to keep my embellishments organized. My goal is to get down to only one bag of embellishments! Right now I have two bags with everything sorted nicely in large manilla folders. I was able to not have a "miscellaneous" category...I didn't want a catch-all category in case I didn't feel like organizing any new embellishments I get...lol!

I would love to hear what ways you've found to organize your supplies!

Happy crafting and be blessed!
Joyce

SMASH kit

I just wanted to quickly share part of a SMASH kit I finally finished putting together. I have a SMASH book...it has a lot of beautiful page...